Stacks and Queues a Beginners Overview

👋 Front-End Developer with a flair for competitive programming & robotics. Expert in 3D CAD design, YouTube educator. Innovating from Oaxaca, México.
Introduction
Hello everyone, welcome back!, today I wanted to give a beginners overview of stacks and queues in Python, we will take a good look at what are they? what are they for? and we will look through some examples together.
What is a stack?
The first time I ever heard about stacks, I couldn't help but imagine a stack of Legos or a stack of boxes, and in programming, a stack is a linear list-based data structure that behaves very similar to a stack of boxes in real life.
The main idea is that you can keep putting elements on top, and you have easy quick access to remove or look at the top element. And just like a stack of boxes in real life, if you want access to the bottom element you can't get to it easily, you will need to take the top box over and over again until you reach the box that you want.
In computer science, a stack is an abstract data type that serves as a collection of elements, with two main principal operations:
- Push, which adds an element to the collection, and
Pop, which removes the most recently added element that was not yet removed.
https://en.wikipedia.org/wiki/Stack_(abstract_data_type)
Pros of using stacks
Stacks can be extremely useful and efficient when you only care about the most recent elements or the order in which you see and save elements matters.
For example, if you made a news page, you'll need to access the more recent elements first and more quickly but you may want to show all of the elements when the user scrolls down.
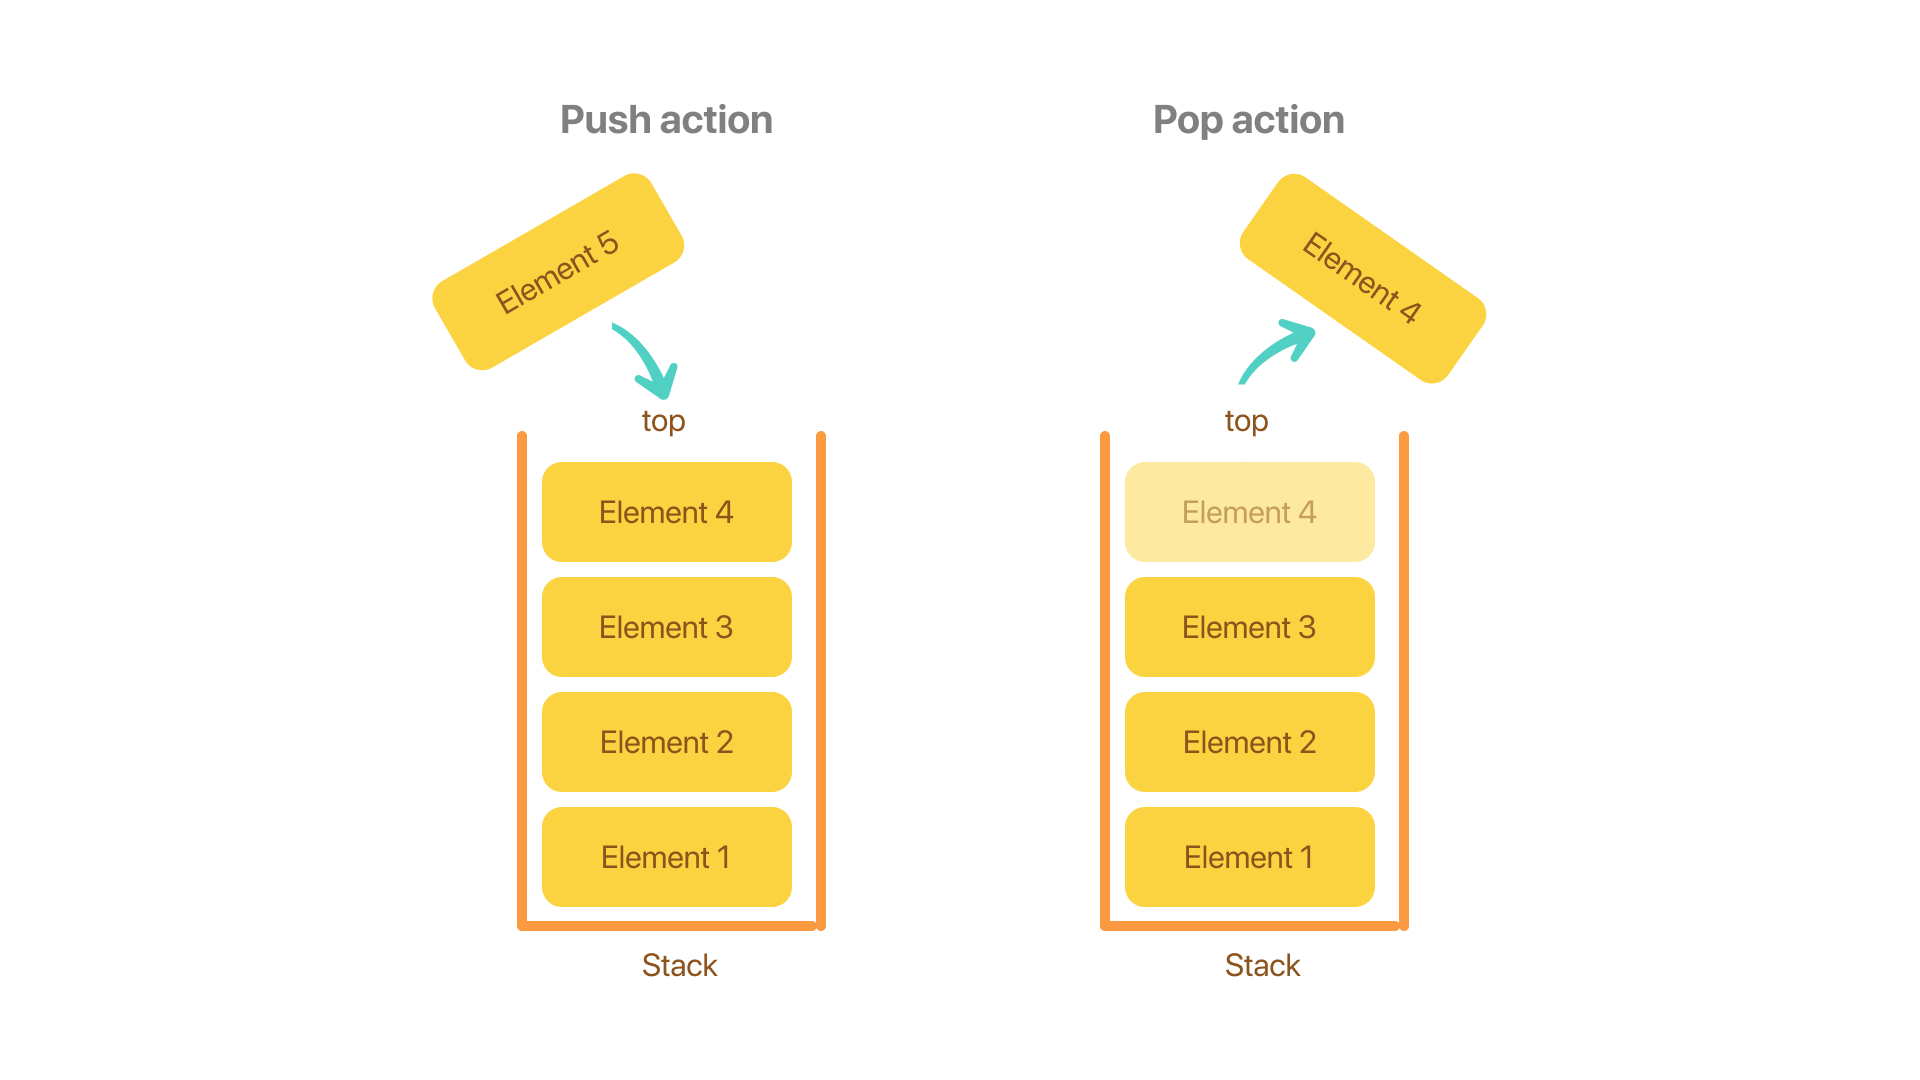
When talking about stacks, it's important to know some specific terminology. When you add an element to a stack, the operation is called "Push" instead of "Insert", and when you take out an element off the stack the operation is called "Pop" instead of "remove", and remember that we always push and pop at the top of the stack. L.I.F.O(Last In, First Out) as the image below illustrates.
Hopefully, you can see that because all you need to do is work with the top of the stack, both operations should take constant time O(1) which can be a really good reason to implement a stack.
Implementing a Stack
Because a stack it's a pretty abstract concept you can actually implement it in two different ways, with an array, or with a Linked list.
Implementing a Stack using an array
A stack has some things in common with an array in the sense that we have a collection of elements and an order to them. One difference with an array is that if we wanted, we could actually access an element in the middle of the array or at the beginning of the array which wouldn't actually be a Stack. Remember that with a stack, we can only access one end, the top.
So how do we implement a stack using an array? well, one way we could look at it is if we rotate an array sideways, we could use it as the container for the stack, then, we could restrict the ways we can interact with this container so that we get the behavior we expect from a Stack, in practical terms, we are going to create a Stack class that has a push and pop methods.
Step 1 - Create the Stack class
class Stack: # defining stack
    def __init__(self): # initializing list
        self.items = []

myStack = Stack() # creating stack
From the code above you can see our Stack class and in the __init__ method we initialize our list that will contain all the items of our stack.
Step 2 - Create the push method
The behavior of this method is very straightforward, simply push a new element into the top of the stack. Python makes this task especially easy thanks to the built-in append method that adds a new element to the end of a list which in this case it's going to be considered the head of our stack. The append method also takes care of the size of the array, so we won't ever have a stack overflow problem.
class Stack: # defining stack
    def __init__(self): # initializing list
        self.items = []
    def push(self, element): # push method
        self.items.append(element) # append method to add an element to the end of the list.

myStack = Stack() # creating stack
print(myStack.items) # [ ]
myStack.push("element1")
print(myStack.items) # ["element1"]
myStack.push("element 2")
print(myStack.items) # ["element1", "element2"] # the head will be considered the end of the list
If you wish to print the stack to get a better understanding of what the stack looks like, you can use print(myStack.items).
Step 3 - Create the pop method
As we mentioned earlier, the purpose of this method is to remove the element at the top of the stack, in this case, the last element of the list. Just as we used the append method for adding elements to our stack, python provides us with a built-in pop method that removes the last element of an array, precisely what we need.
class Stack:
    def __init__(self):
        self.items = []

    def push(self, element):
        self.items.append(element)

    def pop(self):
        self.items.pop()

myStack = Stack() # creating stack
print(myStack.items) # [ ]
myStack.push("element1")
print(myStack.items) # ["element1"]
myStack.push("element2")
print(myStack.items) # ["element1", "element2"]
myStack.pop()
print(myStack.items) # ["element1"]
myStack.pop()
print(myStack.items) # []
myStack.pop() # IndexError: pop from empty list
print(myStack.items)
The pop method takes no arguments, we only pass the self attribute and using self.items.pop() we can easily achieve the desired behavior, but there's a problem, If we call the pop method on an empty array, we are going to get the following error:
IndexError: pop from empty list.
To prevent this error from happening, we are going to check the size of the array first, and if it's not empty, run the pop method like we already have. To check the size of the array we can use the built-in len() method.
class Stack:
    def __init__(self):
        self.items = []

    def push(self, element):
        self.items.append(element)

    def pop(self):
        if len(self.items) > 0:  # checking if not empty
            self.items.pop()


myStack = Stack()  # creating stack
print(myStack.items)  # [ ]
myStack.push("element1")
print(myStack.items)  # ["element1"]
myStack.push("element2")
print(myStack.items)  # ["element1", "element2"]
myStack.pop()
print(myStack.items)  # ["element1"]
myStack.pop()
print(myStack.items)  # []
myStack.pop()
print(myStack.items)  # []
Lastly, we want our pop() method to return the "popped" element and we are done!
class Stack:
    def __init__(self):  # initializing stack
        self.items = []

    def push(self, element):
        self.items.append(element)  # adding new element

    def pop(self):
        if len(self.items) > 0:  # checking if not empty
            return self.items.pop()  # removing and returning the head


myStack = Stack()  # creating stack
print(myStack.items)  # []
myStack.push("element1")
print(myStack.items)  # ["element1"]
myStack.push("element2")
print(myStack.items)  # ["element1", "element2"]
print(myStack.pop())  # element2
print(myStack.pop())  # element1
print(myStack.pop())  # None
Implementing a Stack using a linked list
Previously, we looked at how to implement a stack using an array. While that approach works great in python because the append and pop method takes O(1) constant time, in other languages where there is no such efficiency when working with arrays it might be a good idea to implement a stack using a linked list.
If this is the first time you've heard about a linked list, check out my post titled A Beginners Overview of Linked Lists in Python where I explain what they are, what they are used for, and how to implement one using python. After you've read that article come back and continue from here.
Step 1 - Create the Stack class
As you can see from the code below, we initialize our Stack class with the __init__ method, and we add two attributes: the head which by default it's going to be None since there are no elements in our linked list yet, and we set the num_elements variable to zero for the same reason.
class Stack:
    def __init__(self):
        self.head = None
        self.num_elements = 0
Step 2 - Create a Node class
Because we are going to be implementing a linked list we are going to need a Node class that it's going to be an "element" with a value property and a pointer to the next node in the linked list.
class Node:
    def __init__(self, value):
        self.value = value
        self.next = None

Step 3 - Add Push Method
Next, we will be adding the push method to the Stack class. As we mentioned earlier, the purpose of this method is to remove the element at the top of the stack, in this case, the top of the stack is going to be the head of the linked list.
class Node:
    def __init__(self, value):
        self.value = value
        self.next = None

class Stack:
    def __init__(self):
        self.head = None  # No items in the stack, so head should be None
        self.num_elements = 0

    def push(self, value):
        new_node = Node(value)
        if self.head is None:
            self.head = new_node
        else:
            new_node.next = self.head
            self.head = new_node
        self.num_elements += 1
From the code above, you can see that once the push method is called, we create a new element "Node" with the value passed and we check if the linked list is empty with if self.head is None: if that is the case, we make the head equal to the newly created node. If not, that means that the linked list is not empty, and the next node is now the old head, and the new head will be the new_node, lastly, we increment the number of elements by 1.
Step 4 - Add Pop Method
First, this method needs to check if the stack is empty, then get the value of the head, which is the top of the stack, and store it in a local variable, then change the head to the next node, and in doing so, removing the top of the stack, finally subtract 1 to the number of elements variable in the stack and return the "popped" value.
class Node:
    def __init__(self, value):
        self.value = value
        self.next = None


class Stack:
    def __init__(self):
        self.head = None
        self.num_elements = 0

    def push(self, value):
        new_node = Node(value)
        if self.head is None:
            self.head = new_node
        else:
            new_node.next = self.head
            self.head = new_node
        self.num_elements += 1

    def pop(self):
        if self.num_elements == 0:
            return None
        else:
            value = self.head.value
            self.head = self.head.next
            self.num_elements -= 1
            return value
We are done! now it's time to test it out and see if it works as expected
myStack = Stack()
myStack.push("e1")
myStack.push("e2")
myStack.push("e3")
myStack.push("e4")
print(myStack.num_elements)  # 4
print(myStack.pop())  # e4
print(myStack.num_elements)  # 3
print(myStack.pop())  # e3
Stack Practice - Parentheses Exercise
In this section, you are going to apply what you learned about stacks with a real-world problem. We will be using stacks to make sure the parentheses are balanced in mathematical expressions such as: ((32+8)∗(5/2))/(2+6).
Take a string as an input and return True if its parentheses are balanced or False if it is not.
Step 1 - Get input and Create Stack
For this problem, you can choose to implement the stack with an array or a Linked list, it's completely up to you.
myStack = Stack()
equation = input()
Step 2 - Iterate over the equation string
def solve(equation):
    for char in equation:
Step 3 - Check for an opening parenthesis
def solve(equation):
    for char in equation:
        if char == "(":
            myStack.push(char)
As you can see from the code above, if there is an opening parenthesis, we can add that character to the stack.
Step 4 - Check for a closing parenthesis
If we detect a closing character, we must check if the stack is empty, if it is, we will immediately know that the equation is unbalanced and if is not empty then we remove an element from the stack with the pop method.
def solve(equation):
    for char in equation:
        if char == "(":
            myStack.push(char)
        elif char == ")":
            if myStack.num_elements > 0:
                myStack.pop()
            else:
                return False
Step 5 - Check for leftovers
At this point, if the program finishes iterating over the equation it means that the equation is balanced or that there are leftover elements in the stack if this is the case the equation is unbalanced.
def solve(equation):
    for char in equation:
        if char == "(":
            myStack.push(char)
        elif char == ")":
            if myStack.num_elements > 0:
                myStack.pop()
            else:
                return False

    if myStack.num_elements > 0:
        return False
    else:
        return True
We are done! now it's time to test it out and see if it works as expected.
((3^2 + 8)*(5/2))/(2+6)) False
((3^2 + 8)*(5/2))/(2+6)  True
What is a Queue?
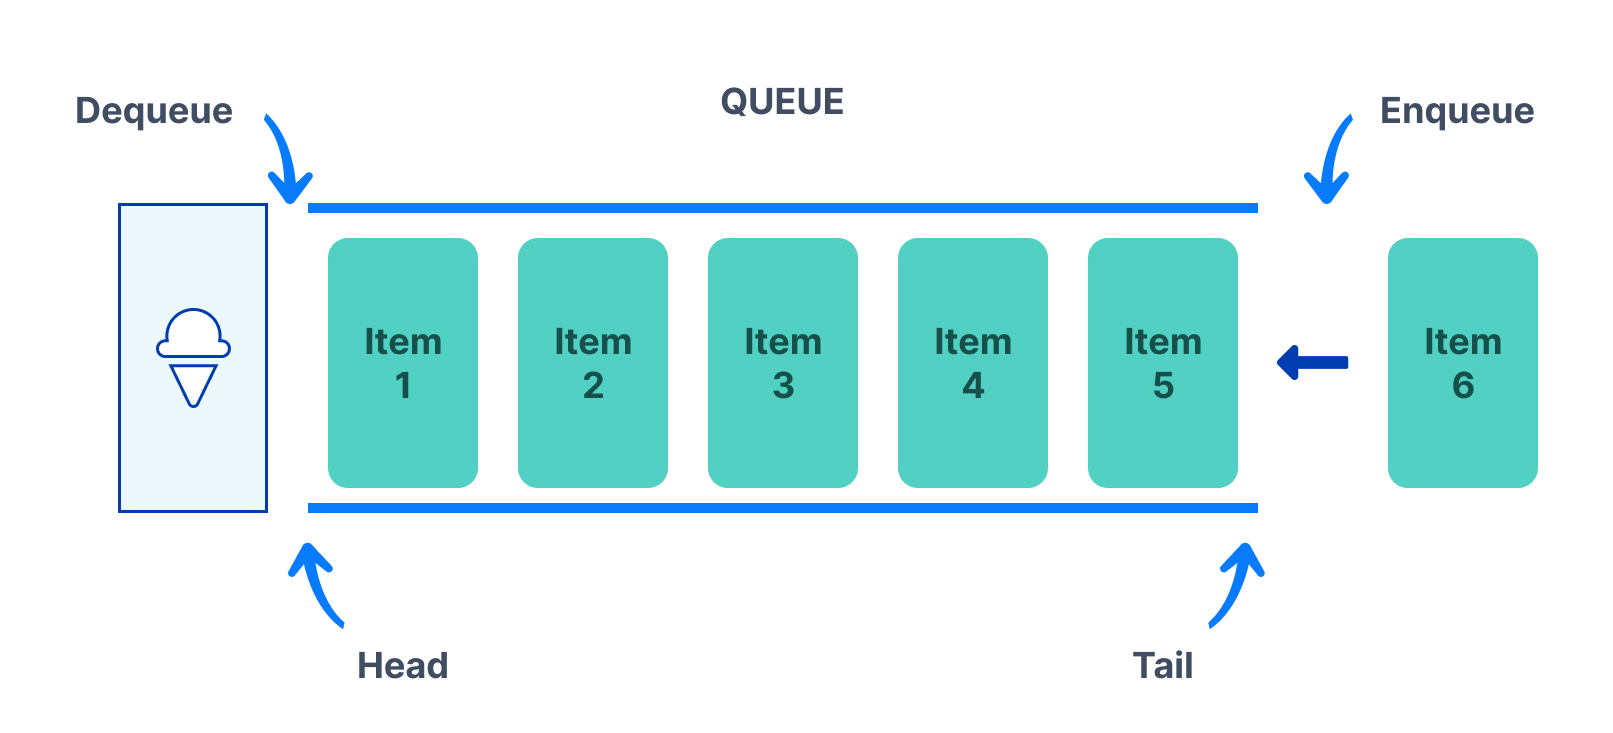
Just like with Stacks, queues have a very descriptive name and behave very similar to a queue in real life, you can imagine a queue of people that are waiting to get their hands on the best ice cream in town. The way this works is that the person who is at the front of the queue is the first one to receive the ice cream and leave. People can always join at the back of the queue but can only receive the ice cream and leave at the front of the queue. This is called a First In, First out structure, remember that a Stack is a Last In, First out structure very similar but kind of the opposite.
When working with queues it's important to know some queue-related terminology like:
- Head - First (oldest) element added to the queue
- Tail - Last (Newest) element added to the queue
- Enqueue - add an element to the back/tail of the queue
- Deque - A double-ended queue and pronounced "Deck"
- Dequeue - Remove the element at the front of the queue
In this section, we'll look at one way to implement a Queue with an array by creating a Stack class that has the following methods:
- Push() - inserts an element at the back/tail of the queue.
- Pop() - removes an element from the front of the queue.
- Front() - returns the first element/Head of the queue.
- Back() - returns the tail of the queue.
- Size() - returns the number of elements in the queue
- Empty() - returns boolean
Trueif the queue is empty.
Implement a Queue using an Array
Step 1 - Create the Queue class
class Queue:
    def __init__(self):
        self.items = []
        self.size = 0
As you can see from the code above, the initialization of our Queue class is basically the same as we did with the Stack, we have an items array and a variable to keep track of the size of the Queue.
Step 2 - Add the push() method
class Queue:
    def __init__(self):
        self.items = []
        self.size = 0

    def push(self, value):
        self.items.append(value)
        self.size += 1
The push method it's the same as the one with the Stack, we are going to handle the end of the array as the tail of the Queue, and with just 2 lines of code, we already added the Enqueue behavior.
Step 3 - Add the pop() method
class Queue:
    def __init__(self):
        self.arr = []
        self.size = 0

    def push(self, value):
        self.arr.append(value)
        self.size += 1

    def pop(self):
        if self.size > 0:
            self.items.pop(0)
            self.size -= 1
The pop method may look very similar to the Stack method, BUT remember that the stack took out the last element of the array, and with a queue, we must take the first element of the array aka the front/head, that's why instead of doing pop() we do pop(0) where 0 it's the index of the array.
Step 4 - Add the front() method
This method simply returns the element that's at the Front/Head of the Queue, this method should not remove the element.
class Queue:
    def __init__(self):
        self.items = []
        self.size = 0

    def push(self, value):
        self.items.append(value)
        self.size += 1

    def pop(self):
        if self.size > 0:
            self.items.pop(0)
            self.size -= 1

    def front(self):
        return self.items[0]
Step 5 - Add the back() method
This method behaves very similarly to the front() method but instead of returning the front, this method should return the last element.
class Queue:
    def __init__(self):
        self.items = []
        self.size = 0

    def push(self, value):
        self.items.append(value)
        self.size += 1

    def pop(self):
        if self.size > 0:
            self.items.pop(0)
            self.size -= 1

    def front(self):
        return self.items[0]

    def back(self):
        if self.size > 0:
            return self.items[self.size - 1] # -1 because indexing starts at 0
As you can see from the code above, the back method first checks that the Queue is not empty, this is important because if we don't check, we are going to get an index out of range error.
Step 6 - add empty() method
class Queue:
    def __init__(self):
        self.items = []
        self.size = 0

    def push(self, value):
        self.items.append(value)
        self.size += 1

    def pop(self):
        if self.size > 0:
            self.items.pop(0)
            self.size -= 1

    def front(self):
        return self.items[0]

    def back(self):
        if self.size > 0:
            return self.items[self.size - 1]

    def empty(self):
        if self.size > 0:
            return False
        else:
            return True
Testing Queue
myQueue = Queue()
myQueue.push(1)
myQueue.push(2)
myQueue.push(3)
myQueue.push(4)
print(myQueue.items)
print(myQueue.size)
print(myQueue.front())
print(myQueue.back())
myQueue.pop()
myQueue.pop()
print(myQueue.items)
print(myQueue.size)
print(myQueue.front())
print(myQueue.back())
Implement a Queue using a Linked List
By now, you may be noticing a pattern. Earlier, we implemented a stack using an array and a linked list. Here, we're doing the same thing with queues.
Step 1 - Create the Queue class
in the cell below, you can see the Queue class initialization with the head and tail set to None and the num_elements variable set to cero.
class Queue:
    def __init__(self):
        self.head = None
        self.tail = None
        self.num_elements = 0
Step 2 - Create Node class
This is exactly the same code we did previously.
class Node:
    def __init__(self, value):
        self.value = value
        self.next = None
Step 3 - Add the push() method
In the method from the cell below, we create a new node with the passed value, and we check if the linked list is empty with if self.head == None:, if it is, we make the head of our linked list to be the newly created node, as well as the tail. if the linked list is not empty, we simply set the next node of the tail to the new node and we shift the tail to make sure it's always at the end. Lastly, we increment the number of elements in the linked list.
class Queue:
    def __init__(self):
        self.head = None
        self.tail = None
        self.num_elements = 0

    def push(self, value):
        new_node = Node(value)
        if self.head == None:
            self.head = new_node
            self.tail = self.head
        else:
            self.tail.next = new_node
            self.tail = self.tail.next
        self.num_elements += 1
Step 4 - Add the pop() method
The first step is to check if the linked list is not empty with if self.num_elements > 0: and if so, we shift the head to the next node removing it from the list, lastly, we subtract 1 to the num_elements counter.
    def pop(self):
        if self.num_elements > 0:
            self.head = self.head.next
            self.num_elements -= 1
Step 5 - Add the front() method.
This method is very easy thanks to the way we keep track of the head on the linked list.
    def front(self):
        if self.num_elements > 0:
            return self.head.value
Step 6 - Add the back() method.
Likewise, creating this method is a breeze thanks to the tail attribute of the linked list.
    def back(self):
        if self.num_elements > 0:
            return self.tail.value
Step 7 - Add the size() method
    def size(self):
        return self.num_elements
Step 8 - Add a print() method
In the first method, we could simply print the array, but here, we need to traverse the linked list and print each of the elements' values.
    def print_items(self):
        current = self.head
        while current:
            print(current.value, "=>", end=" ") # prints in a single line
            current = current.next
        print("")  # just to add the end line at the end
Step 9 - Testing Queue
myQueue = Queue()
myQueue.push(1)
myQueue.push(2)
myQueue.push(3)
myQueue.push(4)
myQueue.print_items()
print(myQueue.size())
print(myQueue.front())
print(myQueue.back())
myQueue.pop()
myQueue.pop()
myQueue.print_items()
print(myQueue.size())
print(myQueue.front())
print(myQueue.back())
Output:
1 => 2 => 3 => 4 =>
4
1
4
3 => 4 =>
2
3
4
Conclution - Farewell
You've reached the end of this lesson on Stacks and Queues, I really hope you liked it and learned something new today, if you have any questions or suggestions, feel free to comment in the section below, remember, there is still a lot to learn and we definitively didn't cover everything on this topic, especially on the applications of the queue like in a BFS algorithm for example, but that's a topic for another day. See you in the next post, stay tuned! 👋